 Download PDF
Part 2: Core Concepts
6. Creating Main Window
Don’t worry if this chapter feels abstract at first - we’ll break it down step by step, and you’ll see how it all fits together. In Part 1 you saw some basic OOP ideas in Perl. In this part, we will just use those ideas in practice; if any word feels unfamiliar, you can safely continue and return to the refresher later.
6.1 Anatomy of a Prima::MainWindow
Creating a main window is a fundamental step in building a graphical user interface (GUI) application. In Prima, this involves defining an instance of the

Figure 6.1: The Main Window
# load the modules Prima and Prima::Application # Prima::Application sets up the application environment and controls # the event loop use Prima qw( Application );# create a new window object, which is an instance of the Prima::MainWindow # class, and it will appear as a window rectangle on the screen Prima::MainWindow->new(# here we define the window properties );# start the Prima event loop, which is required to run the GUI Prima->run;
Listing 6.1: The Main Window
6.2 Essential Window Properties (Size, Title, Colors, Icon)
In this section, we define the window’s basic appearance - its size, title, background, and icon - to establish a clear and consistent visual setup.

Figure 6.2: The Main Window with Configured Properties
use Prima qw(Application); # A constructor is like a blueprint for creating objects. Here, new() is # the constructor for Prima::MainWindow. Prima::MainWindow->new(# the following are examples of 'Prima::MainWindow' class properties: # size, backColor, text, icon, and growMode. These will be set, # meaning they will be assigned values # set the window's size using a two-element array: # width = 300, height = 200 size => [300, 200],# set the window's title text to the current script's filename hello.pl # $0 is the Perl special variable for the filename text => $0,# set the background color of the window to white (hexadecimal 0xFFFFFF # see https://www.color-hex.com/ and change # by 0x)) backColor => 0xFFFFFF,# set the window's icon using the 'icon.png' file icon => Prima::Icon->load('icon.png'),# set the growMode property to position the window in the center of the # screen growMode => gm::Center, ); Prima->run;
Listing 6.2: The Main Window with Configured Properties
A small note: what should you do if the icon file can’t be found? A safer approach would be:
icon => (-e 'icon.png') ? Prima::Icon->load('icon.png') : undef,
However, Prima already handles missing icons internally, so it’s usually nothing to worry about.
6.3 Storing and Accessing Window References
The main window (
use Prima qw(Application);

my $mw = Prima::MainWindow->new();
Note that that
6.4 Updating Properties Dynamically with set()
You can update properties dynamically with
use Prima qw(Application);

my $mw = Prima::MainWindow->new();

$mw->set(
    size => [300, 200],
    text => 'Hello',
    backColor => 0xFFFFFF,
);

Prima->run;
Listing 6.3: Setting the Main Window Properties Using the set Function
But it’s often cleaner to define them upfront in
use Prima qw(Application);

my $mw = Prima::MainWindow->new(
    size => [300, 200],
    text => 'Hello',
    backColor => 0xFFFFFF,
);

Prima->run;
Listing 6.4: Setting the Main Window Properties Using the Constructor new()
6.4.1 Where does the ‘set’ method come from?
You might wonder, ‘Where does the
6.4.2 Using direct accessors instead of set
In this tutorial, you’ll often see direct property setters such as:
$label->text("hello");
This calls only the widget’s
7. Understanding Widgets
7.1 What Widgets Are
Widgets (in other languages called components or controls) are the building blocks of your GUI. Think of them as interactive tools - like buttons, text boxes, or checkboxes - that let users interact with your application. In Figure 7.1 the application has one user-interface (UI) widgets: a Button widget that serves as the Exit button.

Figure 7.1: The Main Window with a Button Widget
In Figure 7.2, the application has three user-interface (UI) widgets: a label widget (displaying the text ‘Which programming language(s) do you know?’), six checkbox widgets and a button widget that serves as the Evaluate button.
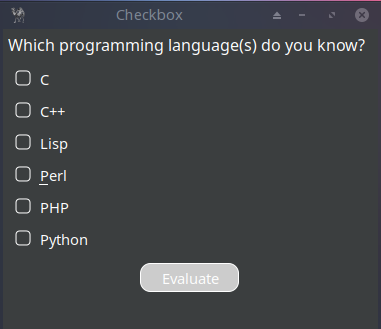
Figure 7.2: The Main Window with a Label Widget, Six Checkbox Widgets, and a Button Widget
Notice: the other graphical elements of the window shown in Figure 7.1 and 7.2, such as the title bar and the control buttons on the left and right sides of the title bar, are not Prima widgets. Rather, they are created and managed by the underlying graphical system in use. Prima only manages widgets; the desktop environment manages window frame elements.
7.2 Overview of Core Widget Categories
Widgets in Prima are organized like a family tree. At the top is the
Widgets can serve different roles:
- Function as windows or interface controls
- Contain other widgets (container widgets)
- Process various events (clicks, keyboard, mouse, timers)
Widgets come in three main categories:
Basic Widgets
- Button: standard clickable button
- Label: displays static text
- CheckBox: for boolean selections
- Radio: single-choice selection within a group
- ComboBox: combined text input and dropdown
- ListBox: selectable item container
- InputLine: single-line text input
- Edit: multi-line text editor
Interactive Widgets
- Menu: traditional dropdown menu bar
- Dialog: base for dialog windows
Container Widgets
- Widget: fundamental base class
- Window: main application container
- GroupBox: logical grouping container (especially for radio buttons)
- Notebook: tabbed interface organizer
7.3 Common Properties, Methods, and Events
Every widget in Prima has properties and methods that define how it looks and behaves. Properties are like settings - such as color, size, or text - while methods are actions you can perform, like showing or hiding a widget. Notice that for the methods of widgets like MainWindow, Buttons, Labels etc., you should first know the properties and methods of their parent! It means that you should know the features of
Let’s explore some of the most useful properties and methods, ideal for initial usage and essential configurations (look further at https://metacpan.org/dist/Prima/view/pod/Prima/Widget.pod under API).
Properties define how a widget looks and behaves:
name: the widget's identifier.
text: the label or content displayed.
color: foreground color *)
backColor: background color
visible: boolean (1 = visible, 0 = hidden).
geometry: size (width/height) and position (X/Y coordinates).
growMode => gm::Center: positions the window in the center of the screen;
Methods let you interact with the widget programmatically:
show(): makes the widget visible.
hide(): hides the widget.
update(): refreshes the widget's content.
focus(): sets input focus to the widget
close(): call can_close() and if succesful, destroys the widget
destroy(): destroys the widget...brute force! Immediately removes the widget from memory. Use this method with caution, as it bypasses safety checks (like close()). It’s best for situations where you need to forcefully remove a widget.
*) Colors can be defined using hexadecimal values (e.g.,
Properties and methods are your tools for customizing widgets. Try changing the
Before we add a widget to our MainWindow, let’s take a moment to understand how event programming works - the key to making our interface interactive. Once we know how events connect user actions to program responses, we’ll be ready to insert a button widget that actually does something.
8. Event-Driven Programming
Event-driven programming is all about responding to user actions. Imagine your application as a smart home: when someone rings the doorbell (an event), the system automatically turns on the lights (a response). In Prima, you define these responses using event handlers.
Event-driven programming might sound complex, but Prima makes it straightforward. When your program runs:
- Prima automatically starts an event loop that continuously monitors for user interactions
- Your widgets (buttons, input fields, etc.) generate events when users interact with them
- You simply define what should happen for each type of event
8.1 The Event Loop and Application Flow
The event loop is the core of Prima's operation:
- It constantly checks for new events (clicks, keypresses, etc.)
- When an event occurs, it finds and executes the matching event handler
- After processing, it immediately returns to monitoring for new events
The event loop runs automatically in the background. It constantly listens for user actions - like clicks or keypresses - and triggers the appropriate response. You don’t need to manage it manually; Prima handles it for you!
8.2 Handling User Input
Prima handles multiple simultaneous events by:
- Placing events in a queue
- Processing them in the order they occurred
- Ensuring your application remains responsive
8.3 Event Handlers and Callbacks
Event handlers define how your program reacts to user actions. Each handler responds to a specific event—for example, a mouse click or a key press. In Prima, the names of these handlers always start with
Your task as the programmer is simple:
- For basic actions: use the built-in event handlers
- For custom behavior: attach your own callback functions
A callback is just a regular Perl function that Prima calls automatically when the event occurs. Here is a basic button click handler:
onClick => sub {
    # Close the application when the button is clicked
    $::application->close;
}
You can also use named callbacks, which helps keep your code readable as handlers become more complex:
onClick => \&do_exit,

sub do_exit {
    $::application->close;
}
The event-driven model means that:
- You never need to write complex event-management code
- Logic stays separate from the user interface
- Event sequencing is handled automatically
As a result, you can focus on what should happen, and Prima takes care of when it happens.
8.4 Event Handling and the special @_
Event handling refers to the mechanism by which the program responds to various events, such as user actions (like clicking a button or entering text) or system-generated events (like timers or window resizing). Event-driven programming is especially common in graphical user interfaces (GUIs) and server applications.
8.4.1 How Event Handling Works
- Events: these are actions or occurrences, such as clicking a button, typing in a text field, or resizing a window.
- Event Handlers: these are subroutines or callbacks that are executed in response to an event. When an event occurs, the associated event handler is triggered to handle that event.
- Binding Events: in GUI toolkits like Prima, you can bind specific events (like
onClick oronChange ) to event handlers for different widgets (buttons, text fields, etc.).
8.4.2 The special array @_
In Perl and Prima, subroutines, including event handlers, receive their arguments via the special array @_. This array contains all the parameters passed to the subroutine. For event handling, @_ typically holds:
$_[0] : the widget (or object) that triggered the event. This is often referred to as$self in object-oriented Perl because it refers to the current object.$_[1] ,$_[2] , etc.: these may contain additional information about the event, such as details specific to the type of event (e.g., a key press or mouse click).
Using
8.4.3 Example
In this tutorial you’ll find many examples of the special array @_. For now an easy example. If you have multiple buttons and want to identify which one was clicked, you can use
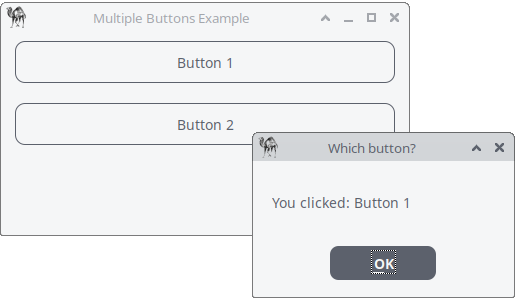
Figure 8.1: Which Button Was Clicked?
use Prima qw(Application Buttons Label MsgBox);

my $mw = Prima::MainWindow->new(
    text => 'Multiple Buttons Example',
    size => [400, 200],
    icon => Prima::Icon->load('icon.png'),
);

$mw->insert( Button =>

    pack   => {fill => 'x', side => 'top', pad => 20},
    text   => 'Button 1',
    onClick => sub {
                        my($self) = @_;
                        message_box("Which button?",
                                    "You clicked: " . $self->text,
                                    mb::OK,
                                    compact => 1 );
    },
);

$mw->insert( Button =>

   pack   => {fill => 'x', side => 'top', pad => 20},
   text   => 'Button 2',
   onClick => sub {
                       message_box("Which button?",
                       "You clicked: " . $_[0]->text,
                       mb::OK,
                       compact => 1 );
   },
);

Prima->run;
Listing 8.1: Which Button Was Clicked?
8.4.4 Some events and @_
A button widget (e.g.,
- Click – fired when the button is clicked:
my ($self) = @_;
onClick => sub { ... };
- MouseDown / MouseUp – fired when the mouse button is pressed or released:
my ($self, $btn, $mod, $x, $y) = @_;
onMouseDown => sub { ... };
onMouseUp   => sub { ... };
- MouseMove – triggered when the mouse moves over the button:
my ($self, $mod, $x, $y) = @_;
onMouseMove => sub { ... };
- KeyDown / KeyUp – fired when a key is pressed or released while the button has focus:
my ($self, $code, $key, $mod[, $repeat]) = @_;
onKeyDown => sub { ... };
onKeyUp   => sub { ... };
- MouseEnter / MouseLeave – fired when the pointer enters or leaves the button area:
my ($self, $mod, $x, $y) = @_;
onMouseEnter => sub { ... };

my ($self) = @_;
onMouseLeave => sub { ... };
Later we’ll explore how to discover which events a widget supports.
8.4.5 Application keyboard shortcuts, bind to a button
To bind a keyboard shortcut like

Figure 8.2: onKeydown Event
use Prima qw(Application Buttons Label MsgBox); my $mw = Prima::MainWindow->new( text => 'Button KeyDown Example', size => [335, 200], icon => Prima::Icon->load('icon.png'), ); # button with an onClick event (for mouse clicks)* # and onKeyDown event (for keyboard events)* my $button = $mw->insert(Button => text => 'Click Me or Press Ctrl+M', origin => [0, 80], size => [200, 50], growMode => gm::Center, onClick => sub { message_box("Info onClick", "Button was clicked!", mb::Ok, compact=>1, ); }, onKeyDown => sub {# event handler receive their arguments via the special array @_ my ($self, $keycode, $key, $mod, $repeat) = @_;# check if Ctrl is pressed and key is Ctrl+M (which is keycode 13) # keycodes can differ depending on platform; Ctrl+M on my system is # ASCII 13. if ($mod & km::Ctrl and $keycode == 13) { message_box("Info onKeyDown", "Ctrl+M with keycode " . $keycode . " was pressed!", mb::Ok, compact=>1,); } }, );# set focus to the button when the application starts, so it can capture keyboard events $button->focused(1); Prima->run;
Listing 8.2:: onKeydown Event
Closing Words
You now have all the foundational concepts needed to understand how Prima applications are built and how they behave. In this part, we explored how to create windows, how widgets are structured, and how properties and methods shape their appearance and behavior. Most importantly, you learned how event-driven programming allows your application to react to user actions - and how Prima uses the special array
These ideas may feel new at first, but with practice they quickly become natural. As you continue, you’ll discover how these basic tools combine to build complete, interactive interfaces.
Your journey with Prima is just beginning - let’s continue!